Phone Numbers
Introduction
In this guide, you will learn how to rent a phone number and enable it for messaging. A rentable phone number is also called a DID (Direct Inward Dialing).
There are two ways to set up a phone number:
- through CarrierX Portal via the user interface
- programmatically via the CarrierX API
Depending on your preferences you can select either of them.
Rent and Enable Messaging Using Portal
Rent a Phone Number
Let's rent a phone number through the Portal.
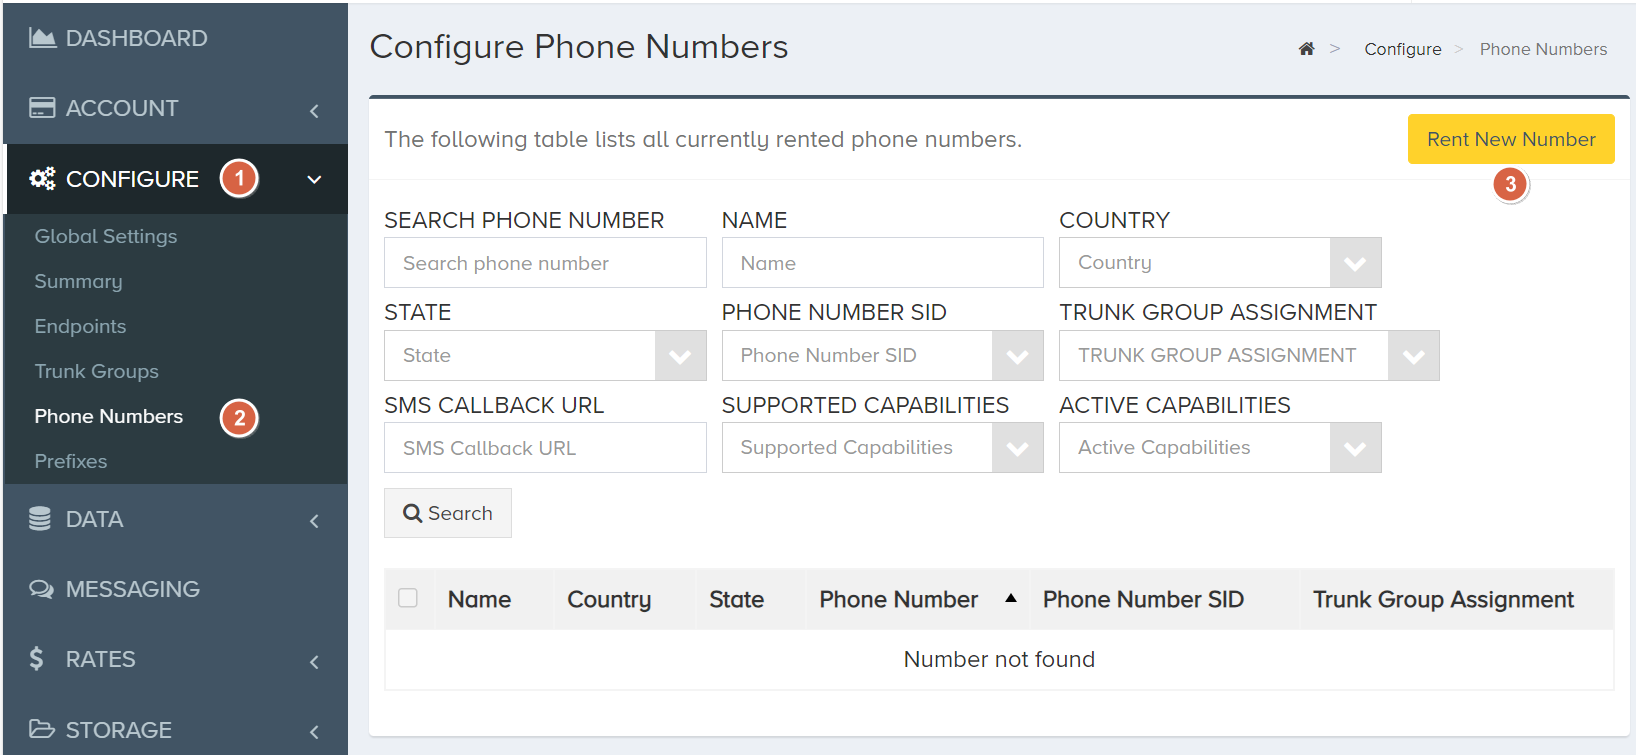
In the left-hand navigation menu, select CONFIGURE > Phone Numbers. Then, in the top-right corner, click the Rent New Number button.
Select a Country of your phone number. Optionally, if you would like to select a specific geography or an area code, select a State and Area Code.
Make sure to select the SMS checkbox so that the phone numbers shown in the search results will have SMS capabilities.
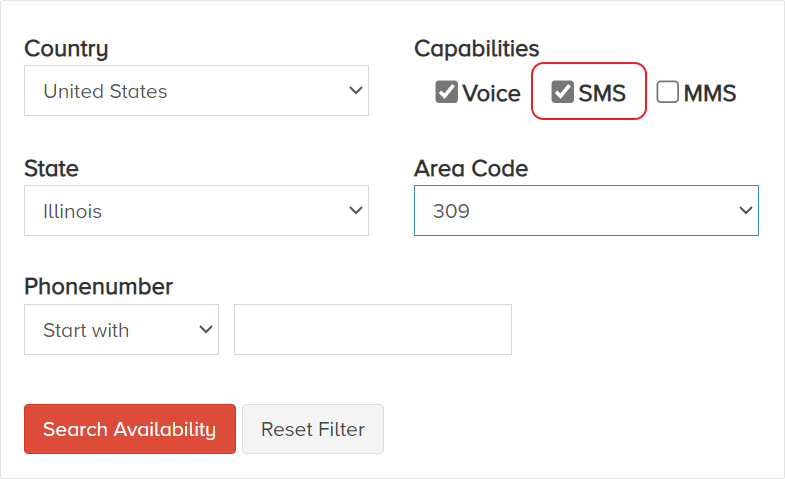
Click the Search Availability button.
When the Search Availability button is clicked, the phone numbers list below will populate with numbers available for the selected state, area code and capabilities.
Select a phone number and click the Rent Number button.
The Rent Phone Number modal will appear. Check Yes, I want to rent this Phone Number and click the Rent Number button.
Enable Messaging for a Phone Number
One more thing you need to do is to enable messaging for your new phone number.
From the list of rented phone numbers, select the number you've just rented. In the phone number details, open the SMS Enablement tab, click the Edit button.
In the Enabled dropdown menu, select true and click the Update button.
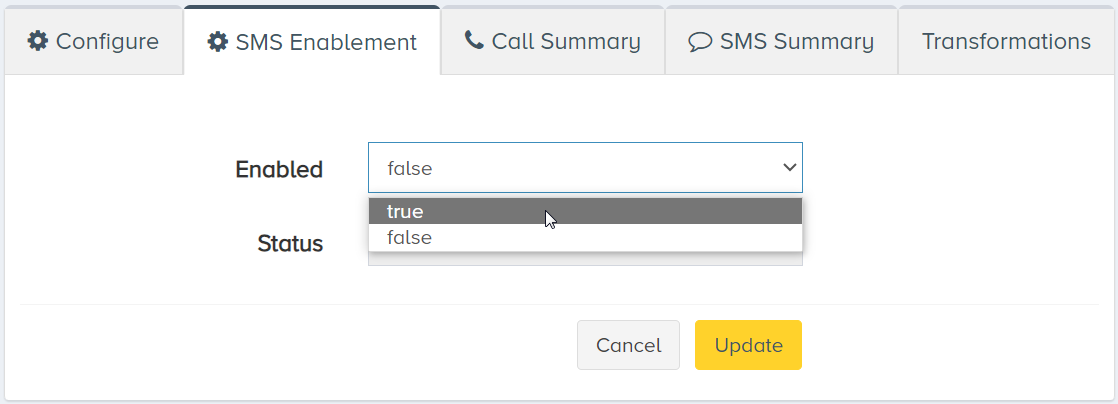
The messaging Status will change to in_progress meaning that the phone number is being processed for message enablement. Usually it takes a few seconds for the messaging Status to be updated by the system but sometimes this process may take up to several minutes. To check the current messaging status, return to the SMS Enablement tab a bit later. As soon as the messaging Status changes to enabled you are ready to send your first SMS message using the Portal.
We have rented a phone number and enabled messaging on it through the portal. In the next section, we will go over renting a phone number programmatically.
Rent a Phone Number and Enable Messaging Programmatically
Rent a Phone Number Using REST API
In this Quick Start, we will rent a random phone number using a POST request.
This is where you are going to need the security token you have created earlier.
To rent a phone number for messaging, send a POST request with an empty body to the /phonenumber/dids endpoint.
To make sure that the number we have rented is capable of messaging we will need to include the filter query parameter with a value of capabilities bit 31.
Refer to the corresponding API Documentation sections for more details about API requests result filtering and phone number capabilities.
curl -X POST \
'https://api.carrierx.com/core/v2/phonenumber/dids?filter=capabilities+bit+31' \
-H 'Content-Type: application/json' \
--data-binary '{}' \
-H 'Authorization: Bearer 5ebc03d6-8b2b-44ad-bf65-72d4f1491dda'
The system will assign you a random available phone number (aka DID) with full supported capabilities.
A successful request will return a 200 status code along with a response that looks like the following:
{
    "active_capabilities": 4,
    "attributes": {},
    "callback_url": null,
    "capabilities": 31,
    "country_code": "USA",
    "did_group_sid": null,
    "did_sid": "f448e2c3-88c1-4cd1-8cf2-3567c16e0794",
    "in_country_format": "(516) 206-5575",
    "international_format": "+1 516-206-5575",
    "locality": "NEW YORK",
    "name": "N/A",
    "partner_sid": "e00430c3-a7d0-4666-ab5c-f7202448382f",
    "phonenumber": "15162065575",
    "price": "0.6",
    "state": "NY",
    "transformations": [],
    "trunk_group_sid": null
}
Enable Messaging Using REST API
Now that you have rented a phone number with messaging capabilities, you need to enable it for messaging using a POST request.
curl -X POST \
'https://api.carrierx.com/core/v2/phonenumber/dids/f3125c23-29dd-41b7-5dbc-89edba59230d/messaging' \
-H 'Content-Type: application/json' \
-H 'Accept: application/json' \
--data-binary '{"enabled": "true"}' \
-H 'Authorization: Bearer 5ebe03d6-8b2b-44ad-bf65-72d4f1491dda'
A successful request will return a 200 status code with information about the status of messaging enablement for this DID.
{
    "enabled": true,
    "status": "in_progress"
}
The first status the system returns is in_progress, meaning that the phone number is being processed for message enablement. Usually messaging enablement is updated within a few seconds, but sometimes this process may take up to several minutes.
You can check the DID messaging status by sending a GET request. Once status is equal to enabled you are ready to move on.
curl -X GET \
'https://api.carrierx.com/core/v2/phonenumber/dids/f3115c13-29dd-41b7-5dbc-89edbc59230d/messaging' \
-H 'Authorization: Bearer 5ebc03d6-8b2b-44ad-bf65-72d4f1491dda'
A successful request will return a 200 status code along with a response that looks like the following:
{
    "enabled": true,
    "status": "enabled"
}
Next Steps
You have rented a phone number and enabled messaging on it! Now you can start sending messages using your new phone number.