Account Prep
This guide will use the CarrierX portal for most of the configuration. The same configuration can be performed using the API.
To start, we will ensure that your CarrierX account is ready to use now and in the future. This may be especially useful for new accounts.
If you are an existing customer, you may simply move on to the next section, phone numbers.
CarrierX Portal
The CarrierX portal is available from anywhere on the website by clicking the button on the right side of the top navigation bar, or you can navigate to https://www.carrierx.com/portal.
If you are unfamiliar with our portal or would like to better understand it, use our guided tour.
Username and Password
A username and password is required to access the CarrierX portal.
Username
Once an account has been setup for you, you will receive an email from CarrierX with your username. If you have not received your username and expected to, please contact your CarrierX representative or email us at support@carrierx.com.
Password
For your security, CarrierX does not send passwords. You can set your password by using the Forgot Password page, always available from the Login page.
Profile Information
Once logged in, use the left navigation to access ACCOUNT > Profile. On the Profile Information page, you can see company & contact information, as well as important specifics about account billing.
Take a moment to verify the account information is correct. If any changes are needed, you can use the Edit button to make any updates. When you are finished, click the Save button to record your changes.
Automatic Billing
The Automatic Billing section shows your current balance, and importantly, how your balance is maintained. When your balance drops below the specified amount, your card will be charged the amount in the Charge payment method field.

In the example above, when the account balance drops below $20, the provided payment method is charged $100, topping up the account balance and preventing a potential disruption to service.
Those values can be controlled by clicking the Edit button and updating the fields.
Payment Method
If your account balance drops below $0, your CarrierX services may be paused. Keeping billing information up to date and supplying a payment method helps ensure your service will not be interrupted.
Trial accounts are typically provided a balance sufficient to complete testing. Once any evaluation is complete and successful, please add a payment method.
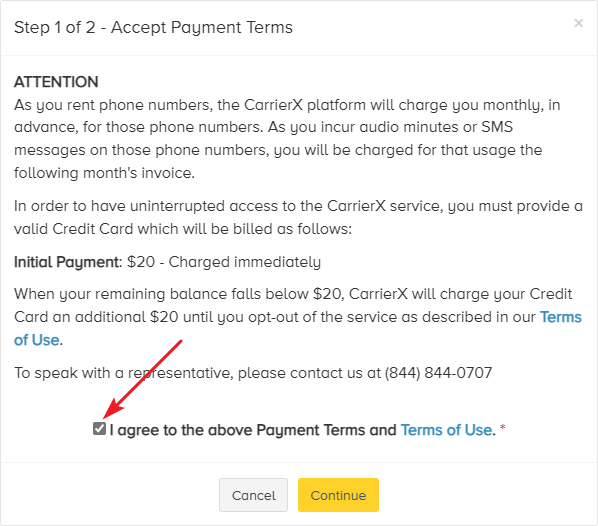
The supplied payment method is charged when your account balance goes below the chosen level. To add a payment method, start by clicking the Add Payment Method button. After reviewing the payment terms and terms of use, check the box to show your agreement and click the Continue button.
Enter your credit card and billing information, then click Add Card.
Security Token
All API calls need to be authenticated. While it is possible to supply your account name and password, it is safer and more secure to use a security token.
In this section, we will create a security token for use with the Core API.
Create a Security Token
The token you are about to create will have full access to use your CarrierX API. It should be treated like a password and not be shared or committed in a repository where it might be compromised.
In the portal, navigate to ACCOUNT > Security Tokens. Then click the Add New Token button.
The token name is for your use only and should be descriptive of your purpose. Perhaps Messaging Token for this guide.
Give the token a name and click the Create Token button.
Get the Access Token
In the list of security tokens, select the one you just created. Below the list, the detail of your newly created token will be shown.
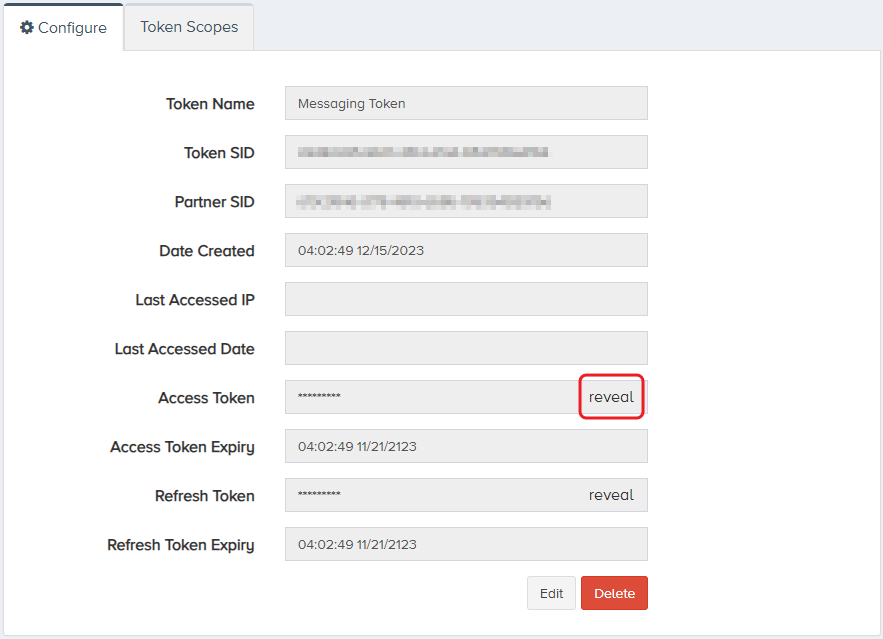
The token is hidden for security. To show the token, click reveal in the Access Token field.
For all subsequent API calls in this guide, you will supply this access token as a Bearer token in the HTTP call. Please refer back to this section when you need to make an API call with a token.
Onward
With your account ready to go, the next up is renting a phone number and enabling messaging on that number.