Receiving Messages and Delivery Records
CarrierX uses callbacks, or webhooks, to alert your application to messaging events. When an event occurs CarrierX will send a Message Detail Record or MDR. In this section, we will create a web endpoint on your server to receive MDRs and configure a callback to communicate with that endpoint.
MDRs
MDRs tell you about the status of a message and include, among other information:
- direction -
inboundfor received messages,outboundfor sent messages - to and from
- status - indicates the stage of delivery (
sent,delivered,received, etc.)
Notice that MDRs are sent for both outbound message status and inbound message reception. Pay attention to the direction field to ensure you correctly process inbound messages.
When a message is sent via the API, a message SID, or Secure ID, is returned. This same SID will be included in message delivery records related to the sent message, allowing you to track the status of the message as it progresses.
Create an Application to Handle Callbacks
First, let's create a short application that will receive callbacks about inbound and outbound messages from our rented CarrierX phone number. The application will:
- print whether the message is inbound or outbound as well as the details of the event
- if the inbound message is the HELP keyword, send the required response back to the sender's phone number.
We will use Python in our sample application, but you may use any programming language you are comfortable with.
From our callback data, we will take the following values:
direction, so that we will perform different actions depending on the message direction,message, so that if the message text is help, we will send the help response to the sender,to, which is the phone number that the SMS was sent to,from, which is the phone number that the SMS was received from.
Create a POST request that in case of an inbound will swap the to and from values replying to the sender.
The steps for the app creation are the following:
-
Create a
messaging_callback.pyfile to hold the code for our application. -
Import the necessary modules from Python and Flask into that file (
requestto access the incoming request data,requeststo create aPOSTrequest, andjsonto form thePOSTrequest payload):from flask import Flask, request
import requests, json -
Initiate the Flask application:
app = Flask(__name__) -
Create a route that will contain the main application logic that will apply as soon as a message is received:
- Receive JSON callback data (with the message body and other information) from the sender's and recipient's phone numbers.
- Parse the data and get the
direction,message,to, andfromvalues. - Check
- if the message direction is
inboundthe application prints the callback data informing us that an inbound message has been received.- if the message direction is
inboundand themessageis some form of the word help, the application responds to the sender's phone number with a preformatted HELP response:
Sample Company
Contact customer support at 800-555-1212
Text STOP to stop all messages
Msg&Data rates may apply
- if the message direction is
- if the message direction is
outbound, the application will print the message delivery record including the delivery status that will besentin the first callback anddeliveredorfailedin the second callback.
- if the message direction is
The resulting application code will look like the following:
from flask import Flask, request
import requests, json
app = Flask(__name__)
# Create a message to respond to incoming 'HELP' messages
HELP_RESPONSE = '''Sample Company
Contact customer support at 800-555-1212
Text STOP to stop all messages
Msg&Data rates may apply
'''
@app.route('/', methods=['POST'])
def home():
# Get the Message Delivery Record
data = request.get_json()
direction = data.get('direction','')
# Check to see if the event is an 'inbound' or 'outbound' message
if direction == 'inbound':
# Print a pretty version of the MDR
print(f'\nInbound message: {json.dumps(data, indent=4)}')
# If the message is some form or 'help', send the help response
message = data.get('message', '').lower().strip()
if message == 'help':
send_to = data.get('from','') # Send TO the number that sent 'HELP'
send_from = data.get('to','') # Send FROM the number that received 'HELP'
url = "https://api.carrierx.com/core/v2/sms/messages"
headers = {'Authorization': 'Bearer 5ebc03d6-8b2b-44ad-bf65-72d4f1491dda', 'Content-Type':'application/json'}
payload = {"from": send_from, "to": send_to, "message": HELP_RESPONSE}
requests.post(url, data=json.dumps(payload), headers=headers)
else:
# Print a pretty version of the MDR
print(f'\nOutbound delivery record: {json.dumps(data, indent=4)}')
# The returned value is ignored by CarrierX, so return empty string
return ''
Now you can start your application with the following command:
FLASK_APP=messaging_callback.py flask run
Finally, you need to expose the application route publicly on the Internet so that the callback can access it. You can either host the application on your own server, or use the free ngrok tool for testing purposes. Refer to ngrok website for more information on how to use it.
Configure Callbacks
Now that we have an application ready to accept MDRs, let tell CarrierX where to send them, by configuring callbacks. There are three ways to configure callbacks:
- Globally via the portal
- Per phone number via the portal
- Per phone number via the API
Configure Global Callback via Portal
If you use the same callback for all phone numbers, you can set a global SMS callback URL in the portal.
In this tutorial we will use https://example.com/your_callback_url as the example callback URL. Use the actual URL where your callback-handling application is hosted.
To set a global SMS callback, in the left-hand navigation menu, select CONFIGURE > Global Settings, then select the Callbacks tab.
Click the Edit then the Add Callback button.
For Key select sms and for Value enter the URL of your application.
Finally, click the Update button.
Configure Per Phone Number Callbacks via Portal
Callbacks can be set on individual phone numbers which is handy when you have different processes for different numbers.
If you are working with few phone numbers, it may be simpler to set the callback configuration on the portal as it only needs to be set once.
In this tutorial we will use https://example.com/your_callback_url as the example callback URL. Use the actual URL where your callback-handling application is hosted.
To set up a callback, in the left-hand navigation menu, select CONFIGURE > Phone Numbers. Select your rented phone number.
On the Configure tab, click Edit and in the SMS Callback URL field enter the callback URL.
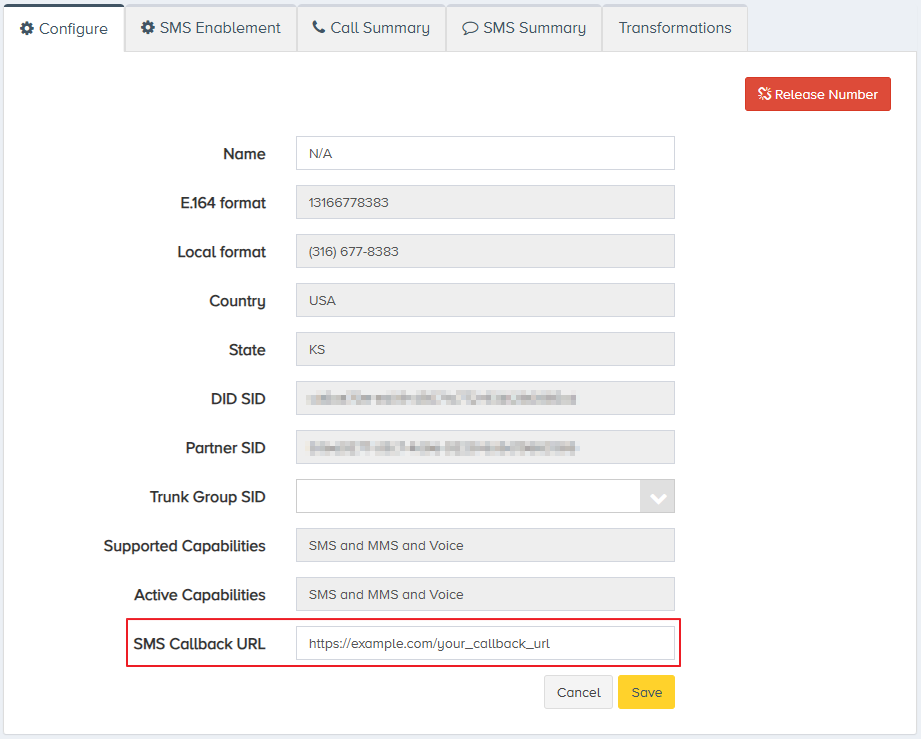
Click the Save button.
You have now assigned a callback URL for your phone number through the portal. Messaging events on that number will trigger callbacks to the application we created earlier.
Configure Per Phone Number Callbacks Using API
Callbacks can be set on individual phone numbers which is handy when you have different processes for different numbers.
If the API is being used to rent phone numbers or you are using many numbers, the API is likely the best way to manage configuring callbacks. In the following example, we will assign a callback for messaging events on our rented DID. Create a PATCH request assigning the callback_url value to the DID object.
In this tutorial we will use https://example.com/your_callback_url as the example callback URL. Use the actual URL where your callback-handling application is hosted.
curl -X PATCH \
'https://api.carrierx.com/core/v2/phonenumber/dids/3ba9a073-63a4-4d48-9db6-f7ac963efe9a' \
-H 'Content-Type: application/json' \
--data-binary '{"callback_url": "https://example.com/your_callback_url"}' \
-H 'Authorization: Bearer 5ebc03d6-8b2b-44ad-bf65-72d4f1491dda'
A successful request will return a 200 status code along with the updated DID object.